I love fall—the crisp mornings, collecting mini pumpkins, and bringing fall leaf paintings to life. Few things are more beautiful to me than a falling leaf in a whirlwind of color. So, what better idea than to create a fall leaf drawing? Whether your kid wants a fall maple leaf, a red oak, or a birch, these fall leaf pictures are ideal.
I’ll tell you the benefits of a fall painting activity and how to set it up. I’ll even drop in some info on why leaves change color to share with curious children (you’re welcome)!
RELATED: Collect your toddlers, preschoolers, and big kids. Let’s add this outdoor art idea to the list of 50+ Autumn Activities. It is time to get started!

- Why this Activity is Great for Preschoolers!
- Why Do Fall Leaves Change Color?
- How to Draw a Fall Leaf
- Supplies for Your Fall leaf Painting Activity
- How to Set Up Fall Leaf Paintings
- Craving a calmer morning?
- Fall Leaf Paintings are Incredible for Kids of All Ages!
- Other Activities for Autumn or Painting
- Frequently Asked Questions
Why this Activity is Great for Preschoolers!
- Color exploration – A fall leaf drawing or painting allows children to explore colors.
- Connects kids to nature – Equally important, including a fall leaf in play connects children with nature. They will inevitably ask, ‘Why does a leaf change color?’
- Facilitates curiosity – It initiates questions, and curiosity leaves to learning (see what I did there?) Curiosity is a virtuous cycle. The more curiosity is fed, the more curious kids get – expanding their knowledge of the world.
- Grip and motor skills – Gripping the brush and using strokes to paint help them practice and strengthen their motor skills. These skills are essential later in life for holding cups, tying shoelaces, and becoming independent.
Why Do Fall Leaves Change Color?
I love using the book, Why Do Leaves Change Color? to introduce why a fall leaf goes from green to red, to yellow, to brown. I’ve given you a book summary so you have a head start (you can thank me later).
SUMMARIZE & SAVE THIS CONTENT ON
The cliff notes on why leaves change colors.
Leaves work all summer to help the tree grow. The leaves contain chlorophyll (a pigment), giving leaves their green color.
In the fall, the cool weather tells the leaves they have done their job, and the green fades. Then the other colors appear before you see a falling leaf from the tree.
Children ask questions (and that’s a good thing). So, it’s essential when teaching your kids that you understand the subject yourself. Remember, you don’t have to know everything about a fall leaf! You can learn along with them.
RELATED: Have a big kid and desperate for hands-on learning ideas? The BIG KID ACTIVITY CARDS are here to help!

How to Draw a Fall Leaf
Before you start, you must know how to create a fall leaf drawing so your kids can begin painting. It can be as creative or simple as you want.
Outlining a falling leaf coming off a tree can be fun! However, if you’re not the artistic type, then a basic outline is more than enough.
- Find Inspiration – You can use fall leaf pictures from a book, or a quick Google will do the job. I like drawing various leaves, like a fall maple leaf or a red oak leaf. Don’t try to be a perfectionist. Just copy them out as best you can.
- Label – Label each leaf so your children can start identifying the leaves. Labeling is something children will see as they read more books. The book I previously mentioned, Why Do Leaves Change Color?, is a lifesaver in naming leaves.

Supplies for Your Fall leaf Painting Activity
- Kraft paper – Get a large roll of kraft paper. It’s pretty robust and can withstand vigorous painting from kids. You can also try a substitute for using the back of a paper bag.
- Old Muffin Tin, Egg Carton, or Cup – they make great pain holders and separate the colors. We put it in an old muffin tin.
- Paint – Opt for primary colors so the kids can experiment with mixing the paint. Getting washable paint is also a good idea, so it easily comes from the clothes.
- Paint Brushes – (Chunky and Thin) you want a range of paintbrush sizes so your children can explore the effects different sizes make. It also helps your little ones who are getting to grips with fine motor skills and need something larger to hold.
- Painter’s tape – This will enable you to stick up to the fall leaf drawing.
- Permanent marker – you’ll need this to draw the outlines of the leaves
- Washable paint – Opt for primary colors so the kids can experiment with mixing the paint. Getting washable paint is also a good idea, so it easily comes from the clothes.
Days with Grey is a participant in the Amazon Services LLC Associates Program, an affiliate advertising program. As an Amazon Associate, I earn from qualifying purchases. Read more about these links in my disclosure policy.
RELATED: First time painting? Try this genius idea to paint with your toddler.
How to Set Up Fall Leaf Paintings
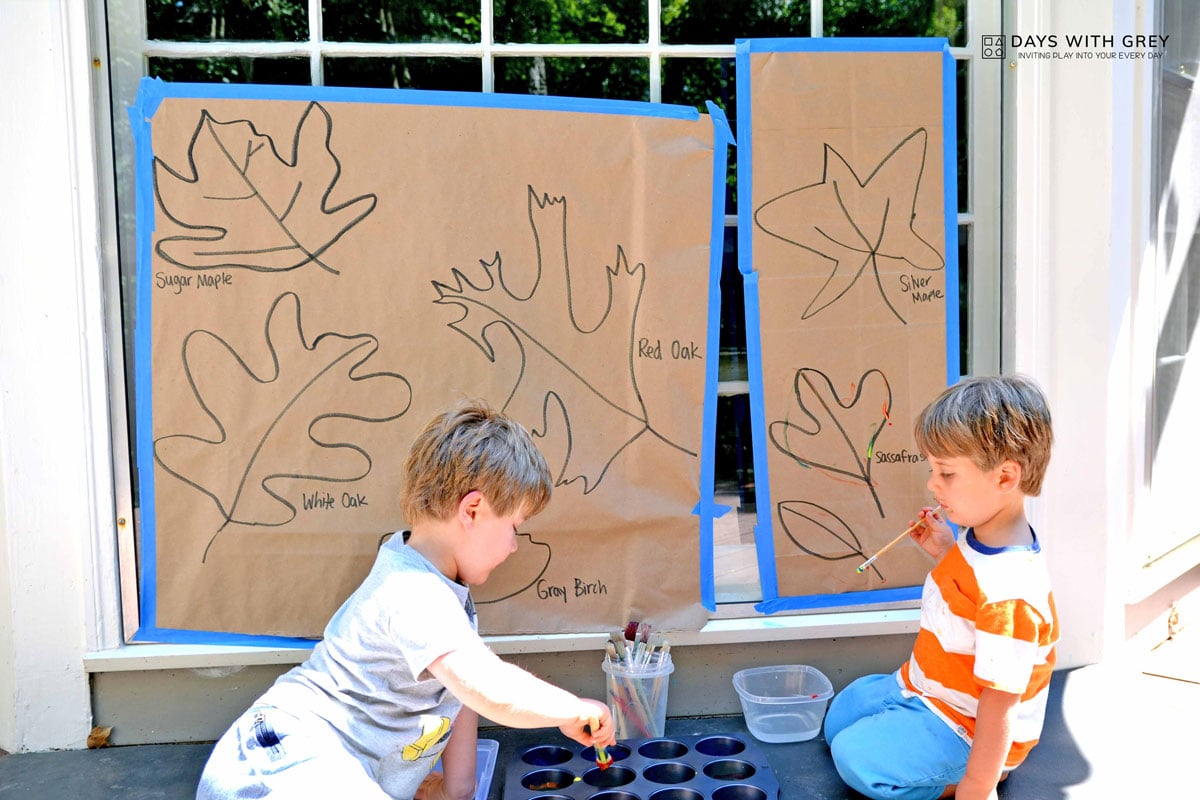
Step 1: Draw your leaves + Label them
Stretch out the kraft paper and use the sharpie to draw outlines of each falling leaf. Remember, the leaves do not need to be perfect. Just like in nature, leaves are imperfect so give yourself a little wiggle room on the final product.
Label the leaves. – again, this is where the leaf book listed above really came in to save me!
I put down our old indoor cycling mat for the kids to kneel on and tape the canvas to our outdoor window with painter’s tape.
I labeled the fall leaves to expose my boys to the different plant names.
Labeling will be something children will see more of as they read more books. I also want to begin the discussion that illustrations can have labels.
We notice labels in many nonfiction books. We can begin to point them out as you read together now!
Step 2: Stick up the Kraft paper leaves
Use the painter’s tape to secure your fall leaf drawing onto a wall, fence, or window. Make sure it’s stretched fairly tightly to make it easier for the kids to paint. Fall leaf paintings are meant to be simple, so don’t overthink perfection.
Step 3: Pour primary-colored paint into old containers
Use whatever paint you have lying around. Kids will use as much paint as you give them, so start small.
Pour the paint into a muffin tin, egg carton, or cup. We keep these items and our simple art supplies in the art cart to have on hand.
I like to use primary colors only for my children to begin exploring color combinations. I also added gold paint for it to shimmer.
RELATED: Looking for just a little more information on how to paint with kids? I have you covered.
Step 4: Lay down an old towel, mat, or shower curtain
Put something underneath the fall leaf masterpiece to catch dripping paint.
Step 5: Put out a selection of different brush sizes
You want your little ones to experiment and develop different skills. Place a small container with water, add the paintbrushes, and let your little artists get to work.
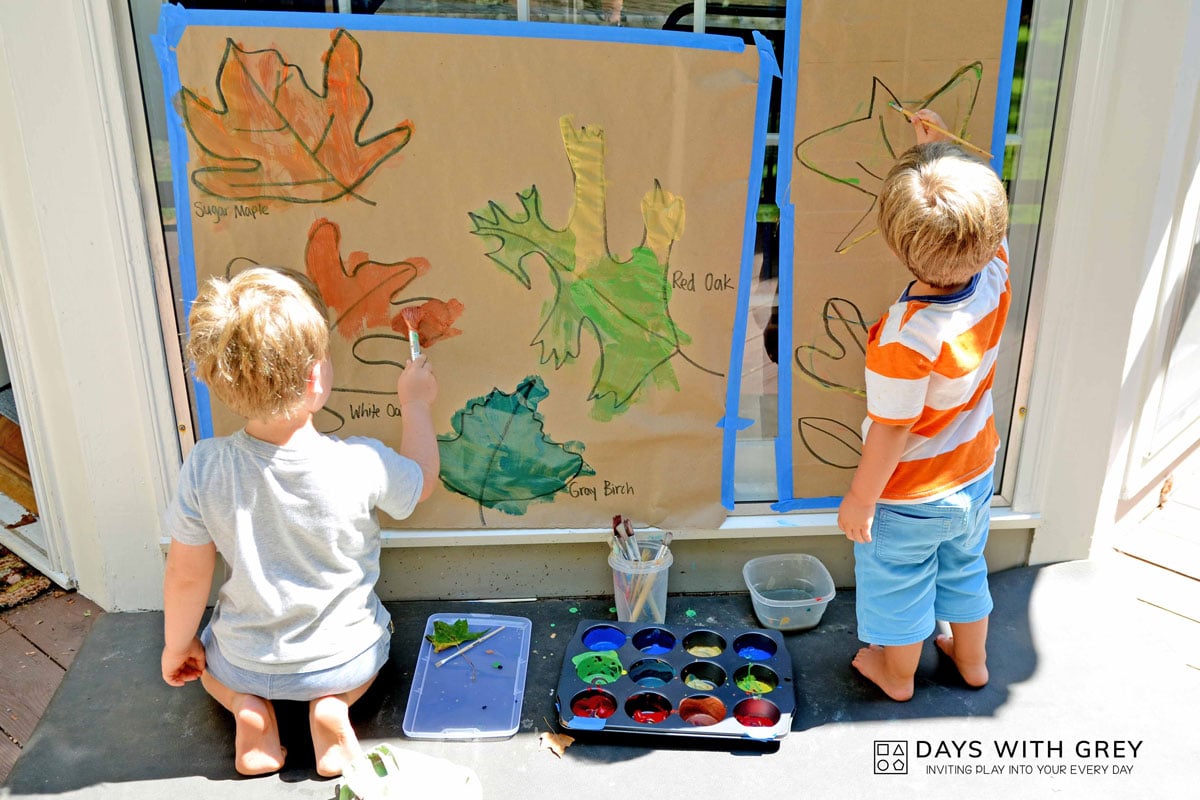
Step 6: Watch the fall leave fun unfurl!
My preschooler and toddler worked on their fall leaf paintings for a reasonable amount of time. As they worked, they talked about the colors they were making and the differences in each leaf. A perfect fall afternoon to pass the time, get creative, and improve fine motor strength!
RELATED: Skipping fall and headed right into Halloween? You will get a kick out of 31 Days of Halloween.

Craving a calmer morning?
Breakfast Invitations are simple learning games that begin the day with play.
Fall Leaf Paintings are Incredible for Kids of All Ages!
This amazing play connects children to the seasons as they expand their knowledge, explore color, and develop their motor skills. Simple, cheap, and quick to set up, a fall leaf drawing is something you can use repeatedly.
RELATED: Continue the fun with more fall activities for kindergartens and preschoolers.

Other Activities for Autumn or Painting
- 50 Fall Activities for Preschoolers
- Glue the Fall Leaves
- Easy Painting Activities for Kids
- Painting with Toddlers – Everything You Need to Know
Frequently Asked Questions
Washable tempera paint works best when painting with kids. I put the paint into muffin tins and ensure my children wear older clothes.
I know. Painting with kids can appear to be a giant mess, but it takes some practice. Read this guide on how to paint with kids to get started.
Set up painting activities on a surface that is easy to clean up. I like to put mural paintings on the back window because we can hose it down when the kids are finished painting.
Mixing paint is part of the magic! To avoid an instant brown, I set the paints out with colors that mix well. I add paints into the muffin tin and leave a few sections without paint for the boys to mix the colors. It doesn’t take long for children to notice different color combinations and which ones they may want to avoid.


